

Building a tree swing for your backyard is more than just a fun project—it’s an opportunity to create lasting memories with your loved ones. From brainstorming the design to that first exhilarating test swing, every step of the process brings with it a sense of accomplishment and joy. In this guide, we’ll walk you through the steps of designing and constructing a DIY tree swing, ensuring that it’s both safe and enjoyable for everyone.
Brainstorming the Design
Before diving into the actual construction, it’s important to decide on the type of swing you want to build. There are several designs to choose from, such as the classic wooden plank, a comfortable tire swing, or even a more elaborate disc swing. Consider the age and preferences of the swing users. For a nostalgic touch, a simple wooden plank swing may be the perfect choice. Alternatively, if you’re aiming for something more modern, a disc or tire swing could be ideal.
Choosing the Perfect Tree
The next step is selecting the perfect tree. The tree you choose needs to be sturdy and mature, with a strong horizontal branch at least 8-10 feet off the ground. Oaks and maples are excellent choices due to their robust branches. Make sure the branch you select is healthy and free from cracks or signs of rot. This ensures that the swing will be both safe and durable.
Gathering Materials
Once you have your design and tree in mind, it’s time to gather materials. The basic supplies you’ll need include a sturdy rope, a plank of wood (if you’re making a traditional swing), and some heavy-duty eye bolts or swing hangers. It’s also essential to have a drill, measuring tape, and sandpaper on hand. For extra comfort, consider adding some padding to the swing seat or using a durable outdoor cushion.
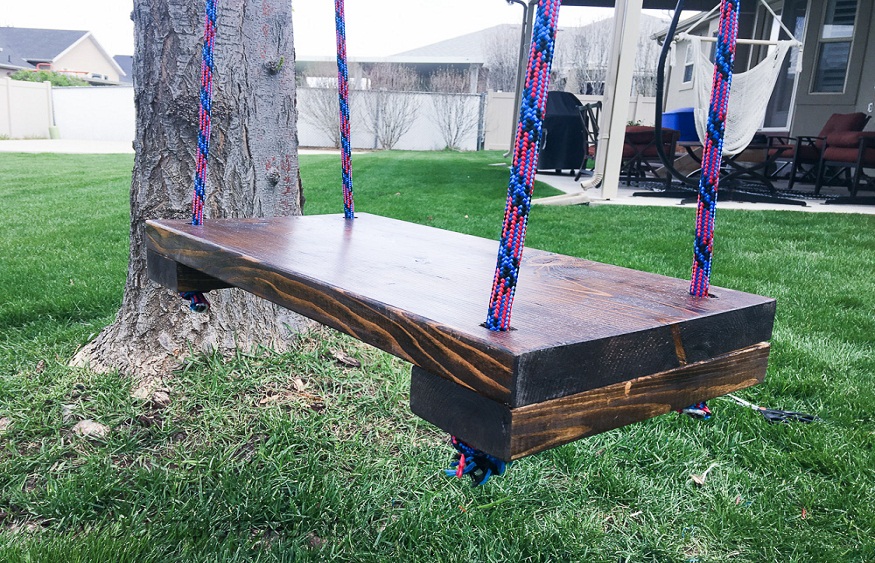
Building the Swing
Begin by cutting the plank to size and sanding down any rough edges. Drill holes in each end of the plank, making sure they are evenly spaced. Thread the rope through the holes and tie secure knots underneath the plank. If you’re using a tire or disc, follow similar steps to ensure the swing is balanced and the knots are secure.
Next, drill holes into the tree branch and insert the eye-bolts or swing hangers. Attach the ropes to these fixtures, making sure the swing hangs evenly and at a comfortable height. Double-check all knots and connections before moving on to the final step.
First Swing Test
With the swing now securely installed, it was time for the moment of truth: the first test swing. There was a buzz of excitement and a hint of nervous anticipation as we gathered around. The first swing was a joyous mix of laughter and exhilaration as the swing sailed smoothly through the air. Watching the smiles and hearing the cheers confirmed that our hard work had paid off. The swing was a hit, bringing delight and a sense of accomplishment to everyone who took a turn!
Documenting the Journey
Recently, while digitizing an old VHS tape of my father building a tree swing, I rediscovered footage that captured the thrill and effort of that project. This made me realize how many precious memories are stored in old formats. To ensure these moments are preserved, I’ve been using some digital converters and finding different ways to preserve memories.
Inspired by this nostalgic trip, I decided to document our current backyard projects similarly. By taking photos and videos at each stage—from brainstorming and selecting the perfect tree to construction and the exciting first swing—you can capture the whole experience. Adding personal notes about ideas, thoughts, and amusing moments further enriches the story. Sharing these updates on social media or a blog not only showcases your hard work but also inspires others to capture and celebrate their own memorable projects.
Conclusion
Constructing a DIY tree swing is a rewarding project that creates lasting memories, whether you’re reminiscing about the building process or enjoying a swing on a lazy afternoon. To keep these cherished moments alive, consider preserving them by using the best VHS to digital converters for old tapes or exploring other ways to safeguard your photographs. Just as the swing continues to bring joy, so will the memories you’ve captured and preserved for years to come.